1 quart mason jar per guest..........................................................approx. $12/case
Vintage Hankies; 1 per jar. Look for a lot on eBay to get the best deal..............................................................................................approx. $1/hankie
Approximately 6 inches Gold or Silver Elastic Cord per jar. Find this in a craft store near the ribbon....................................................................approx. $2-3/roll
Labels;1 per jar. We had extra space on our address label sheets, so our designer added some small, blank labels. At first, I didn't know what I would use these for, since I envisioned tying the label around the neck with the instructions. But when we made our prototype, it looked better to use the labels on the jars. You can get your designer to take part of your invite and create blank labels for you that you can print at home OR you can simply find a simple template online and design your own! We used small labels that were on the front only, but you could also do wraparound labels or all sorts of other options...............................................varies
Printed instructions adapted from your own recipe........................................varies
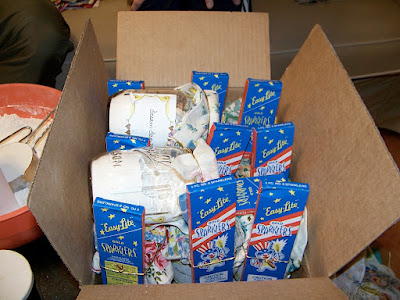
Box of Sparklers; 1 per jar (optional). We bought ours here. They seemed to offer the best deal. Plus, after, you'll get super crazy emails from them. Awesome! ................................................................................................................$9.28/case
The Dry Ingredients from 1 Great Cake Recipe* (DO NOT INCLUDE SUGAR!!) - We used a Cream Cake recipe, which uses cream for the fat instead of butter or oil. You can use your favorite kind of cake recipe..................................................varies
This project is best done assembly line style with a small crew of friends or family. My crew was A.P., the Half-breed Swede, and my oldest brother. In a fit of angst and stress, I almost gave this project up, but they convinced me we could get it done. And we did! It took a couple of hours, but it really wasn't that hard. I was just stressed because it was the week before the wedding and I was overwhelmed. (Btw, this is but a small glimpse of the wedding tornado that struck our apartment one week out. DON'T miss those days at all!)
1. Gather together your crew, some leftover takeout and some leftover booze from your "bachelorette" party. Make sure your crew is well-fed and well-drunk.


2. Begin by cleaning the jars. Or if you're like me, figure they're fine because they're straight from the factory and it's the week before your wedding and you don't have time to clean seventy freaking jars. The germs will cook off, dammit.
3. Finalize labels. Make sure you have written/printed the cake name on your labels. Depending on the type of label you are using (complete wraparound, front only, etc.), size them appropriately. Here is A.P. cutting down all the labels with a beer. See? Well-drunk. And those labels looked good!

3. Place labels on all jars. Make sure you put the labels on the jars first. Putting labels on mason jars can be tricky because of the raised writing on the glass. We tried a couple of test jars first to find the place where the label stuck the best.
4. Tie each six-inch length of elastic cord into a loop. Knots slip out somewhat easily with elastic cord, so make sure the knot is nice and tight. Put all the looped cords into a nice little pile and set aside.
5. Now set up your materials. We removed all the lids from the labeled jars, and then put the jars back in their boxes. On our coffee table, we set up one giant bowl with flour and the appropriate measuring cups, a smaller bowl with baking powder and another bowl with salt. We could fill up a box of jars, and then swap it out for another.
6. Each person takes on a role and you all work to get those damn jars FILLED! A.P. was in charge of labeling the jars and putting them in the box. My brother put in the flour, I put in the salt, and the Half-breed Swede put in the baking powder. Then all of us put lids on the jars. See the big bowl of flour next to one of the completed boxes? It looks like we're fancy coke dealers.

7. Fold the hankies in half, then quarts. If you have smaller hankies, you may have to fold in half only.
8. Fold up your instructions into a small square the size of the lid of your jar. Our instruction sheet was half of a regular sheet of paper (8.5x11), so we had to fold a few times to get it the same size as the jar lid.
9. Place instructions on top of jar lid. Place hankie on top of that. Place looped elastic around the hankie and underneath the lip of the jar.


10. (This step is optional if you include the sparklers.) Place box of sparklers through the elastic loop so that they are snug against the jar.

11. Admire your work. Have a(nother) drink.

See? Super easy, super worth it favors. They were such a hit with our guests and were the perfect personal detail to include in our special day. Plus, it was a nice tie in with the bakery.

*Most cake recipes ask you to mix your sugar with your fat (e.g. butter, oil, or in the case of our recipe, heavy cream), so your dry ingredients will pretty much include flour, baking powder, and salt. Make sure when you are writing your recipe instructions that you explain what you've included in your jar.
Do you subscribe to Not the Marrying Kind? If not, you should! It's free and fun and it means you automatically get new posts when the blog is updated. No having to check back! Click here for more details.
(All photos by me except the last one, which is by Theresa Scarbrough)

No comments:
Post a Comment